Difference between revisions of "The Flaming Orchid"
| (4 intermediate revisions by the same user not shown) | |||
| Line 1: | Line 1: | ||
== Boss == | == Boss == | ||
| − | <i>To go back to bosses page, [[Bosses|click here]]</i> | + | <i>To go back to bosses page, [[Bosses List|click here]]</i> |
<hr> | <hr> | ||
[[File:The Flaming Orchid.gif|link=]] | [[File:The Flaming Orchid.gif|link=]] | ||
| Line 16: | Line 16: | ||
== Loot Table == | == Loot Table == | ||
| + | |||
<table class="wikitable sortable"> | <table class="wikitable sortable"> | ||
| − | |||
| − | |||
| − | |||
| − | |||
| − | |||
| − | |||
| − | |||
| − | |||
| − | |||
| − | |||
| − | |||
<tr> | <tr> | ||
| − | <td align=" | + | <td align="left" valign="top"> |
| − | + | <center>'''[[Items|Boss Items]]'''</center> | |
| − | + | [[File:Boss Coin2.gif|link=]] [[Boss Coin Shop|1-2x boss coin]]<br> | |
| + | [[File:Relic Chest.gif|link=]] [[Relics#Relic_List|relic chest]] | ||
| − | + | [[File:Attunement Item 2.gif|alt=]] [[Soul Attunement|soul of the flaming orchid]] | |
| − | |||
| − | |||
| − | |||
| − | |||
| − | |||
| − | |||
| − | |||
| − | |||
| − | + | [[File:Golden Scorpion Pendant.gif|link=]] [[Amulets|golden scorpion pendant]]<br>[[File:Golden Nasus Pendant.gif|link=]] [[Amulets|golden nasus pendant]]<br>[[File:Gilded Blood Ring.gif|link=]][[Rings|gilded blood ring]] | |
| − | |||
| − | |||
| − | |||
| − | + | [[File:Golden Lotus Quiver.gif|link=]] [[Quivers|golden lotus quiver]]<br>[[File:Golden Lotus Backpack.gif|link=]] [[Backpacks|golden lotus backpack]] | |
| − | |||
| − | |||
| − | |||
| − | + | [[File:Mystic Sun Effigy.gif|link=]] [[Extra Slot|mystic sun effigy]]<br>[[File:Bone Fiddle.gif|link=]] [[Extra Slot|bone fiddle]] | |
| − | + | </td> | |
| − | <td align=" | + | <td align="left" valign="top"> |
| − | < | + | <center>'''[[Jewelry]]'''</center> |
| + | [[File:Crystal Coin.gif|link=]] 3-6x crystal coin | ||
| − | + | [[File:Giant Amethyst.gif|link=]]giant amethyst<br> | |
| − | + | [[File:Giant Ruby.gif|link=]] 1-2x giant ruby | |
| − | |||
| − | |||
| − | + | [[File:Giant Emerald.gif|link=]]1-2x giant emerald | |
| − | |||
| − | |||
| − | |||
| − | + | [[File:Giant Topaz.gif|link=]]1-2x giant topaz | |
| − | |||
| − | |||
| − | |||
| + | [[File:Giant Sapphire.gif|link=]]giant sapphire | ||
| + | </td> | ||
| + | <td align="left" valign="top"> | ||
| + | <center>'''[[Liquids]]'''</center> | ||
| + | [[File:Ultimate Mana Potion.gif|link=]] 1-16x ultimate mana potion<br> | ||
| + | [[File:Ultimate Spirit Potion.gif|link=]] 1-16x ultimate spirit potion<br> | ||
| + | [[File:Supreme Health Potion.gif|link=]] 1-16x supreme health potion<br> | ||
| + | [[File:Mastermind Potion.gif|link=]] 1-5x mastermind potion<br> | ||
| + | [[File:Bullseye Potion.gif|link=]] 1-5x bullseye potion<br> | ||
| + | [[File:Berserk Potion.gif|link=]] 2-5x berserk potion | ||
| + | </td> | ||
| + | </tr> | ||
<tr> | <tr> | ||
| − | <td align=" | + | <td align="left" valign="top"> |
| − | + | <center>[[Gem Atelier|'''Gems''']] | |
| − | + | [[File:Lesser Marksman Gem.gif|link=]][[File:Lesser Mystic Gem.gif|link=]][[File:Lesser Sage Gem.gif|link=]][[File:Lesser Guardian Gem.gif|link=]][[File:Lesser Spiritualist Gem.gif|link=]][[File:Lesser Ninja Gem.gif|link=]] | |
| − | + | [[File:Marksman Gem.gif|link=]][[File:Mystic Gem.gif|link=]][[File:Sage Gem.gif|link=]][[File:Guardian Gem.gif|link=]][[File:Spiritualist Gem.gif|alt=]][[File:Ninja Gem.gif|link=]] | |
| − | |||
| − | |||
| − | |||
| − | + | [[File:Greater Marksman Gem.gif|link=]][[File:Greater Mystic Gem.gif|link=]][[File:Greater Sage Gem.gif|link=]][[File:Greater Guardian Gem.gif|link=]][[File:Greater Spiritualist Gem.gif|alt=]][[File:Greater Ninja Gem.gif|link=]] | |
| − | + | </center> | |
| − | + | </td> | |
| − | + | <td align="left" valign="top"> | |
| − | + | <center>[[Pet Upgrading#Boosts|'''Pet Boost Tokens''']] | |
| − | + | [[File:petice.gif|link=]][[File:petdeath.gif|link=]][[File:petholy.gif|link=]][[File:petfire.gif|link=]][[File:petenergy.gif|link=]][[File:petearth.gif|link=]] | |
| − | |||
| − | |||
| − | |||
| − | |||
| − | |||
| − | |||
| − | |||
| − | |||
| − | |||
| − | |||
| − | |||
| − | |||
| − | |||
| − | |||
| − | |||
| − | |||
| − | |||
| − | |||
| − | |||
| − | |||
| − | |||
| − | |||
| − | |||
| − | |||
| − | |||
| − | |||
| − | <td align=" | ||
| − | |||
| − | |||
| − | < | ||
| − | |||
| − | |||
| − | |||
| − | |||
| − | |||
| − | |||
| − | |||
| − | |||
| − | |||
| − | |||
| − | |||
| − | |||
| − | |||
| − | |||
| − | |||
| − | |||
| − | |||
| − | |||
| − | |||
| − | |||
| − | |||
| − | |||
| − | |||
| − | |||
| − | |||
| − | |||
| − | |||
| − | |||
| − | |||
| − | |||
| − | |||
| − | |||
| − | |||
| − | |||
| − | |||
| − | |||
| − | |||
| − | |||
| − | |||
| − | |||
| − | |||
| − | |||
| − | |||
| − | |||
| − | |||
| − | |||
| − | |||
| − | |||
| − | |||
| − | |||
| − | |||
| − | |||
| − | |||
| − | |||
| − | |||
| − | |||
| − | |||
| − | |||
| − | |||
| − | |||
| − | |||
| − | |||
| − | |||
| + | [[File:petphysical.gif|link=]][[File:petdistance.gif|link=]][[File:petmagic.gif|link=]][[File:petdmg.gif|link=]][[File:petmelee.gif|link=]]</center> | ||
| + | </td> | ||
| + | <td align="left" valign="top"></td> | ||
| + | </tr> | ||
</table> | </table> | ||
Latest revision as of 23:43, 11 August 2026
Boss
To go back to bosses page, click here

Boss Info
 Classification: Archfoe
 Location: Asura's Palace
 Health: 3.6kk
 Experience: 1.5kk
Bosstiary Progress
 Prowess: 5 kills
 Expertise: 20 kills
 Mastery: 40 kills
Loot Table
|
|
|
|
|
|
     |


 3-6x crystal coin
 giant amethyst
 1-2x giant ruby
 1-2x giant emerald
 1-2x giant topaz
 giant sapphire
 1-16x ultimate mana potion
 1-16x ultimate spirit potion
 1-16x supreme health potion
 1-5x mastermind potion
 1-5x bullseye potion
 2-5x berserk potion


Location
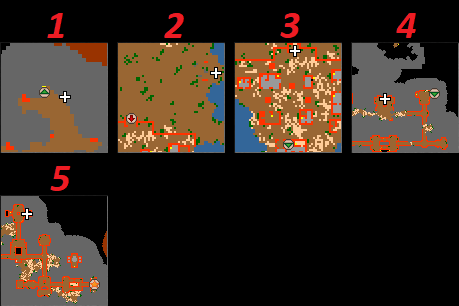
1. Take the waypoint to Roshalor - Stonebreakers
2. Follow the maps below.
3. To face The Flaming Orchid, pull the lever.
You can go either solo or with other 5 players.
Mechanics
Lasers
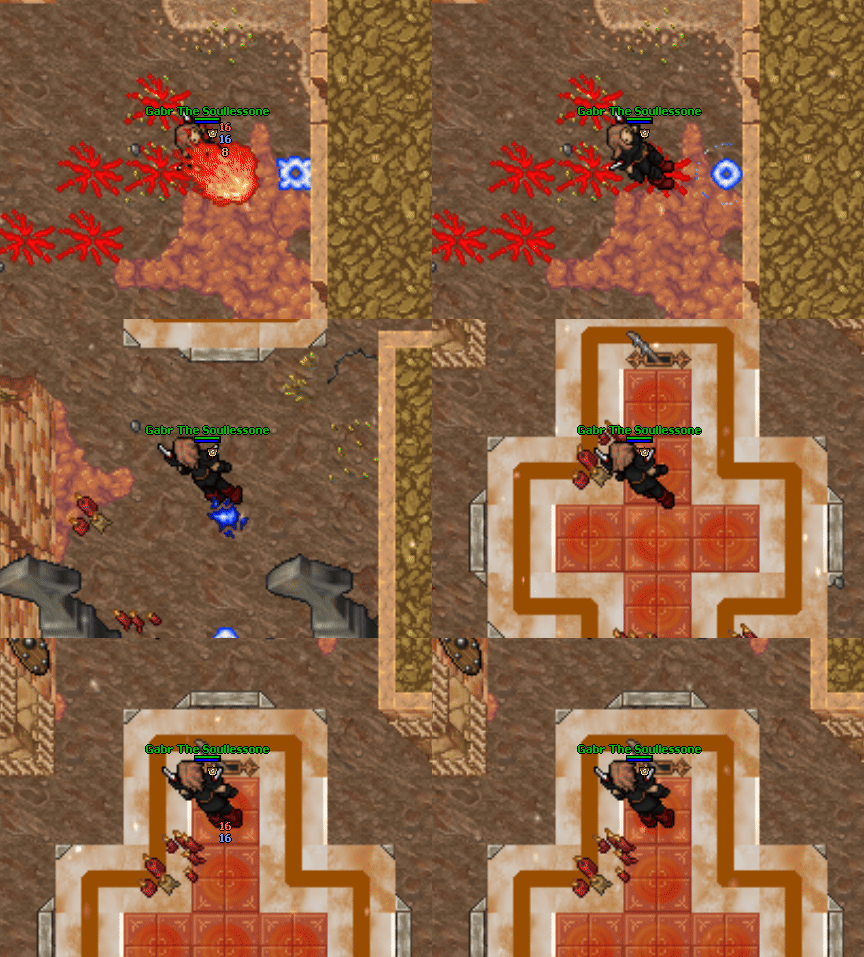
Through the entire fight, you'll see lasers flying across the room from the left to the right.
They leave your character drunk and deal lots of damage.
Once the lever is pulled, you'll be in the route of a laser, so you must step 1 SQM down.
Beside the regular boss mechanics, this is the only thing you will have to care about.
Minion Waves
This fight doesn't start straight on the boss.
Once you get to the room, many minions will be summoned at once to heat you before the final battle.
It means that, you will have to face 8-9 waves of minions before The Flaming Orchid appears.
Waves are summoned automatically when you clear the room.
Having no new waves nor the boss spawning, means that there is a monster still alive inside the room.
The Boss Fight
Once you slay all waves, the boss is going to spawn on the north.
All you must avoid are the regular boss mechanics, and so the lasers that will stay running across the room.