Difference between revisions of "Plagirath"
| (4 intermediate revisions by the same user not shown) | |||
| Line 1: | Line 1: | ||
== Boss == | == Boss == | ||
| − | <i>To go back to the bosses page, [[ | + | <i>To go back to the bosses page, [[Bosses_List|click here]].</i> |
<hr> | <hr> | ||
| − | [[File:Plagirath.gif]] | + | [[File:Plagirath.gif|link=]] |
<b>Boss Info</b><br> | <b>Boss Info</b><br> | ||
| − | [[file:Bosstiary Archfoe.png]] Classification: Archfoe<br> | + | [[file:Bosstiary Archfoe.png|link=]] Classification: Archfoe<br> |
| − | [[file:Speed Icon.gif]] Location: Grounds of Plague<br> | + | [[file:Speed Icon.gif|link=]] Location: Grounds of Plague<br> |
| − | [[File:HP Icon.gif]] Health: 10kk<br> | + | [[File:HP Icon.gif|link=]] Health: 10kk<br> |
| − | [[File:XP Icon.gif]] Experience: 12.5kk<br> | + | [[File:XP Icon.gif|link=]] Experience: 12.5kk<br> |
<b>Bosstiary Progress</b><br> | <b>Bosstiary Progress</b><br> | ||
| − | [[file:Prowess Icon.gif]] Prowess: 5 kills<br> | + | [[file:Prowess Icon.gif|link=]] Prowess: 5 kills<br> |
| − | [[file:Expertise Icon.gif]] Expertise: 20 kills<br> | + | [[file:Expertise Icon.gif|link=]] Expertise: 20 kills<br> |
| − | [[file:Mastery Icon.gif]] Mastery: 40 kills | + | [[file:Mastery Icon.gif|link=]] Mastery: 40 kills |
== Loot Table == | == Loot Table == | ||
| + | |||
<table class="wikitable sortable"> | <table class="wikitable sortable"> | ||
| − | |||
| − | |||
| − | |||
| − | |||
| − | |||
| − | |||
| − | |||
| − | |||
| − | |||
| − | |||
| − | |||
| − | |||
| − | |||
| − | |||
| − | |||
| − | |||
| − | |||
| − | |||
| − | |||
| − | |||
| − | |||
| − | |||
| − | |||
| − | |||
| − | |||
| − | |||
| − | |||
| − | |||
| − | |||
| − | |||
| − | |||
| − | |||
| − | |||
| − | |||
| − | |||
| − | |||
| − | |||
| − | |||
| − | |||
| − | |||
| − | |||
| − | |||
| − | |||
| − | |||
| − | |||
| − | |||
| − | |||
| − | |||
| − | |||
| − | |||
| − | |||
| − | |||
| − | |||
| − | |||
<tr> | <tr> | ||
| − | <td align=" | + | <td align="left" valign="top"> |
| − | + | <center>'''[[Items|Boss Items]]'''</center> | |
| − | + | [[File:Boss Coin2.gif|link=]] [[Boss Coin Shop|1-4x boss coin]]<br> | |
| − | + | [[File:Relic Chest.gif|link=]] [[Relics#Relic_List|relic chest]] | |
| − | + | [[File:Attunement Item 4.gif|alt=]] [[Soul Attunement|soul of plagirath]] | |
| − | |||
| − | |||
| − | |||
| − | |||
| − | + | [[File:Gold Token.gif|link=]] 1-2x gold token | |
| − | + | </td> | |
| − | <td align=" | + | <td align="left" valign="top"> |
| − | < | + | <center>'''[[Jewelry]]'''</center> |
| − | + | [[File:Crystal Coin.gif|link=]] 3-15x crystal coin | |
| − | + | [[File:Bar of Gold.gif|link=]] 2-6x bar of gold | |
| − | |||
| − | |||
| − | |||
| − | |||
| − | + | [[File:Giant Amethyst.gif|link=]]giant amethyst<br> | |
| − | + | [[File:Giant Ruby.gif|link=]] 1-2x giant ruby | |
| − | |||
| − | |||
| − | |||
| − | + | [[File:Giant Emerald.gif|link=]]1-2x giant emerald | |
| − | |||
| − | |||
| − | |||
| − | |||
| − | + | [[File:Giant Topaz.gif|link=]]1-2x giant topaz | |
| − | |||
| − | |||
| − | |||
| − | |||
| − | |||
| − | |||
| − | |||
| − | |||
| − | |||
| − | |||
| − | < | + | [[File:Giant Sapphire.gif|link=]]giant sapphire |
| − | <td align="center | + | </td> |
| − | < | + | <td align="left" valign="top"> |
| − | + | <center>'''[[Liquids]]'''</center> | |
| + | [[File:Ultimate Mana Potion.gif|link=]] 1-16x ultimate mana potion<br> | ||
| + | [[File:Ultimate Spirit Potion.gif|link=]] 1-16x ultimate spirit potion<br> | ||
| + | [[File:Supreme Health Potion.gif|link=]] 1-16x supreme health potion<br> | ||
| + | [[File:Mastermind Potion.gif|link=]] 1-5x mastermind potion<br> | ||
| + | [[File:Bullseye Potion.gif|link=]] 1-5x bullseye potion<br> | ||
| + | [[File:Berserk Potion.gif|link=]] 2-5x berserk potion | ||
| + | </td> | ||
</tr> | </tr> | ||
| − | |||
<tr> | <tr> | ||
| − | <td align="center | + | <td align="left" valign="top"> |
| − | + | <center>[[Gem Atelier|'''Gems''']] | |
| − | + | [[File:Lesser Marksman Gem.gif|link=]][[File:Lesser Mystic Gem.gif|link=]][[File:Lesser Sage Gem.gif|link=]][[File:Lesser Guardian Gem.gif|link=]][[File:Lesser Spiritualist Gem.gif|link=]][[File:Lesser Ninja Gem.gif|link=]] | |
| − | |||
| − | + | [[File:Marksman Gem.gif|link=]][[File:Mystic Gem.gif|link=]][[File:Sage Gem.gif|link=]][[File:Guardian Gem.gif|link=]][[File:Spiritualist Gem.gif|alt=]][[File:Ninja Gem.gif|link=]] | |
| − | |||
| − | |||
| − | |||
| − | |||
| − | + | [[File:Greater Marksman Gem.gif|link=]][[File:Greater Mystic Gem.gif|link=]][[File:Greater Sage Gem.gif|link=]][[File:Greater Guardian Gem.gif|link=]][[File:Greater Spiritualist Gem.gif|alt=]][[File:Greater Ninja Gem.gif|link=]] | |
| − | + | </center> | |
| − | + | </td> | |
| − | <td align=" | + | <td align="left" valign="top"> |
| − | + | <center>[[Pet Upgrading#Boosts|'''Pet Boost Tokens''']] | |
| + | [[File:petice.gif|link=]][[File:petdeath.gif|link=]][[File:petholy.gif|link=]][[File:petfire.gif|link=]][[File:petenergy.gif|link=]][[File:petearth.gif|link=]] | ||
| − | + | [[File:petphysical.gif|link=]][[File:petdistance.gif|link=]][[File:petmagic.gif|link=]][[File:petdmg.gif|link=]][[File:petmelee.gif|link=]]</center> | |
| − | + | </td> | |
| − | + | <td align="left" valign="top"></td> | |
| − | <td align=" | ||
</tr> | </tr> | ||
| − | |||
| − | |||
| − | |||
| − | |||
| − | |||
| − | |||
| − | |||
| − | |||
| − | |||
| − | |||
| − | |||
| − | |||
| − | |||
| − | |||
| − | |||
| − | |||
| − | |||
| − | |||
| − | |||
| − | |||
| − | |||
| − | |||
| − | |||
| − | |||
| − | |||
| − | |||
| − | |||
| − | |||
| − | |||
| − | |||
| − | |||
| − | |||
| − | |||
| − | |||
| − | |||
| − | |||
| − | |||
| − | |||
| − | |||
| − | |||
| − | |||
| − | |||
| − | |||
| − | |||
| − | |||
| − | |||
| − | |||
| − | |||
| − | |||
| − | |||
| − | |||
| − | |||
| − | |||
| − | |||
| − | |||
| − | |||
| − | |||
| − | |||
| − | |||
| − | |||
| − | |||
| − | |||
| − | |||
| − | |||
| − | |||
| − | |||
| − | |||
| − | |||
| − | |||
| − | |||
| − | |||
| − | |||
| − | |||
| − | |||
| − | |||
| − | |||
| − | |||
| − | |||
| − | |||
| − | |||
| − | |||
| − | |||
| − | |||
| − | |||
| − | |||
| − | |||
| − | |||
| − | |||
| − | |||
| − | |||
| − | |||
| − | |||
| − | |||
| − | |||
| − | |||
| − | |||
| − | |||
| − | |||
| − | |||
| − | |||
| − | |||
| − | |||
| − | |||
| − | |||
| − | |||
| − | |||
| − | |||
| − | |||
| − | |||
| − | |||
| − | |||
| − | |||
</table> | </table> | ||
| Line 267: | Line 78: | ||
2. Follow the maps below to find The Void entrance. | 2. Follow the maps below to find The Void entrance. | ||
| − | [[file:the void vortex.png]] | + | [[file:the void vortex.png|link=]] |
3. Into The Void, follow this way to find the gate. | 3. Into The Void, follow this way to find the gate. | ||
| − | [[file:oldo npc.png]] | + | [[file:oldo npc.png|link=]] |
| − | 4. At the gate, use the mechanism to teleport youself to inside the castle. [[file:Mechanism.gif]]<br> | + | 4. At the gate, use the mechanism to teleport youself to inside the castle. [[file:Mechanism.gif|link=]]<br> |
Then, follow the maps below to reach the Ferumbras Seals entrance. | Then, follow the maps below to reach the Ferumbras Seals entrance. | ||
| − | [[file:ferumbras seals entrance.png]] | + | [[file:ferumbras seals entrance.png|link=]] |
| − | 5. With the Teleportation Rod [[file:Teleportation Rod.gif]] on your backpack, head to the <b>east</b> door and enter on the teleporter. [[file:Gate of Deathstruction.gif]]<br> | + | 5. With the Teleportation Rod [[file:Teleportation Rod.gif|link=]] on your backpack, head to the <b>east</b> door and enter on the teleporter. [[file:Gate of Deathstruction.gif|link=]]<br> |
6. Follow the maps below to reach the boss room. | 6. Follow the maps below to reach the boss room. | ||
| − | [[file:plagirath map 1.png]] | + | [[file:plagirath map 1.png|link=]] |
7. To face Plagirath, pull the lever.<br> | 7. To face Plagirath, pull the lever.<br> | ||
You can go either solo or with other 6 players. | You can go either solo or with other 6 players. | ||
| − | [[file:plagirath lever.gif]] | + | [[file:plagirath lever.gif|link=]] |
== Boss Mechanics == | == Boss Mechanics == | ||
| Line 297: | Line 108: | ||
The battle ends as soon as you kill Plagirath. | The battle ends as soon as you kill Plagirath. | ||
| − | [[file:Plagirath Fight.gif]] | + | [[file:Plagirath Fight.gif|link=]] |
Latest revision as of 01:43, 12 August 2026
Boss
To go back to the bosses page, click here.

Boss Info
 Classification: Archfoe
 Location: Grounds of Plague
 Health: 10kk
 Experience: 12.5kk
Bosstiary Progress
 Prowess: 5 kills
 Expertise: 20 kills
 Mastery: 40 kills
Loot Table
|
|
|
|
|
|
     |


 1-2x gold token
 3-15x crystal coin
 2-6x bar of gold
 giant amethyst
 1-2x giant ruby
 1-2x giant emerald
 1-2x giant topaz
 giant sapphire
 1-16x ultimate mana potion
 1-16x ultimate spirit potion
 1-16x supreme health potion
 1-5x mastermind potion
 1-5x bullseye potion
 2-5x berserk potion


Location
1. Take the waypoint to Orr - Cursebite Widows
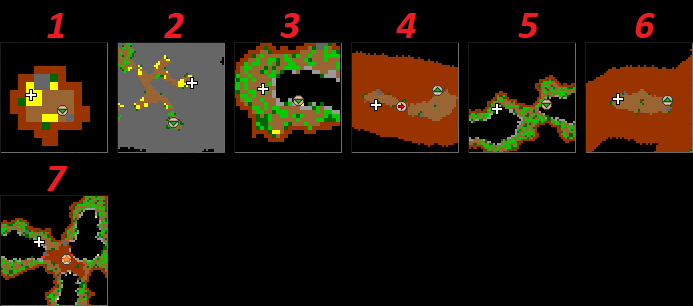
2. Follow the maps below to find The Void entrance.
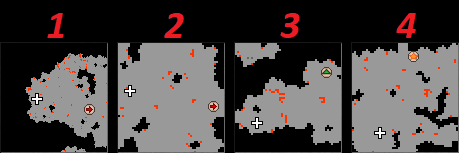
3. Into The Void, follow this way to find the gate.
4. At the gate, use the mechanism to teleport youself to inside the castle. 
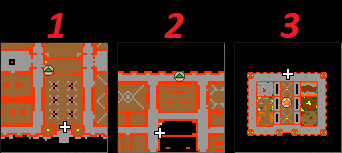
Then, follow the maps below to reach the Ferumbras Seals entrance.
5. With the Teleportation Rod  on your backpack, head to the east door and enter on the teleporter.
6. Follow the maps below to reach the boss room.
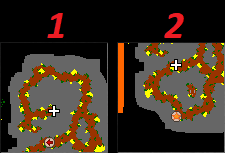
7. To face Plagirath, pull the lever.
You can go either solo or with other 6 players.
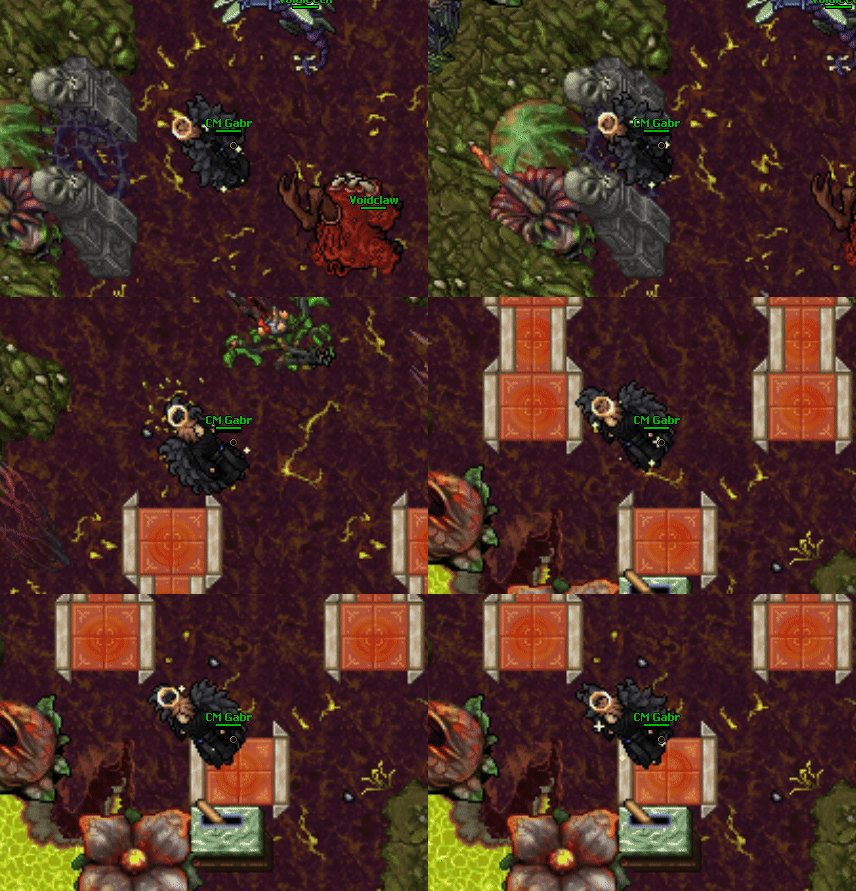
Boss Mechanics
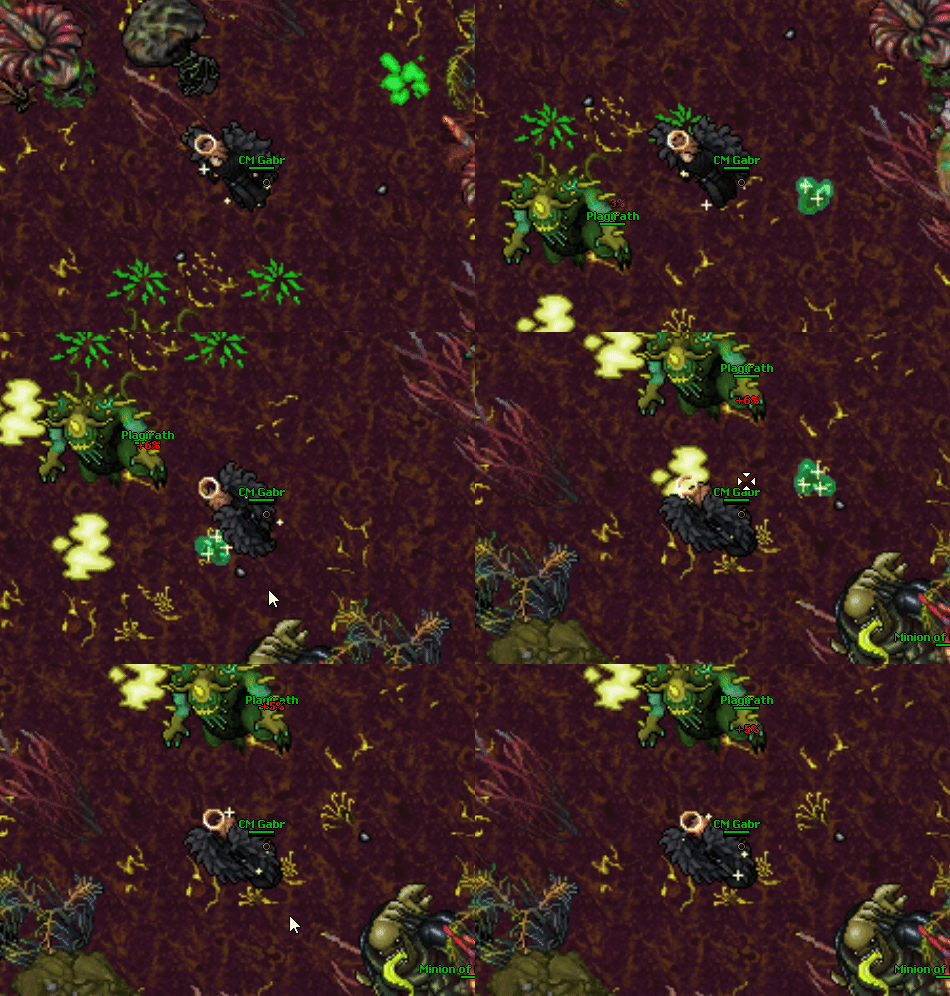
Around the boss room, after a few seconds, it will spawn some sparkling green things.
All you must do is drag these into yellow fields spawned all over the room.
The more yellow fields the room has, stronger the boss will be.
The battle ends as soon as you kill Plagirath.