Difference between revisions of "Sugar Mommy"
| (16 intermediate revisions by the same user not shown) | |||
| Line 1: | Line 1: | ||
| − | == | + | == Boss == |
| − | <i>To go back to the bosses page, [[Bosses | + | <i>To go back to the bosses page, [[Bosses List|click here]].</i> |
<hr> | <hr> | ||
| − | + | [[File:Sugar Mommy.gif|link=]] | |
| − | |||
| − | [[File: | + | <b>Boss Info</b><br> |
| + | [[file:Bosstiary Archfoe.png|link=]] Classification: Archfoe<br> | ||
| + | [[file:Speed Icon.gif|link=]] Location: Candia<br> | ||
| + | [[File:HP Icon.gif|link=]] Health: 3.5kk<br> | ||
| + | [[File:XP Icon.gif|link=]] Experience: 12.5kk<br> | ||
| − | + | <b>Bosstiary Progress</b><br> | |
| − | < | + | [[file:Prowess Icon.gif|link=]] Prowess: 5 kills<br> |
| − | + | [[file:Expertise Icon.gif|link=]] Expertise: 20 kills<br> | |
| − | + | [[file:Mastery Icon.gif|link=]] Mastery: 40 kills<br> | |
| − | |||
| − | |||
| − | |||
| − | |||
| − | |||
| + | == Loot Table == | ||
| + | |||
| + | <table class="wikitable sortable"> | ||
<tr> | <tr> | ||
| − | <td align=" | + | <td align="left" valign="top"> |
| − | < | + | <center>'''[[Items|Boss Items]]'''</center> |
| − | + | [[File:Boss Coin2.gif|link=]] [[Boss Coin Shop|1-4x boss coin]]<br> | |
| − | + | [[File:Relic Chest.gif|link=]] [[Relics#Relic_List|relic chest]] | |
| − | + | ||
| + | [[File:Attunement Item 3.gif|alt=]] [[Soul Attunement|soul of sugar mommy]] | ||
| + | |||
| + | [[File:Chocolate Helmet.gif|link=]][[Helmets|chocolate helmet]] | ||
| + | |||
| + | [[File:Chocolate Plate.gif|link=]] [[Armors|chocolate plate]] | ||
| + | |||
| + | [[File:Chocolate Legs.gif|link=]] [[Legs|chocolate legs]]<br>[[File:Chocolate Boots.gif|link=]] [[Boots|chocolate boots]] | ||
| + | |||
| + | [[File:Candy Necklace.gif|link=]] [[Amulets|candy necklace]]<br>[[File:Candy Ring.gif|link=]] [[Rings|candy ring]] | ||
| + | |||
| + | [[File:Candy Backpack.gif|link=]] [[Backpacks|candy backpack]] | ||
| + | |||
| + | [[File:Candy Quiver.gif|link=]] [[Shields|hardcandy shield]] | ||
| + | |||
| + | [[File:Hidden Chocolate Holytome.gif|link=]] [[Spellbooks|hidden chocolate holytome]] | ||
| − | </ | + | [[File:Ancient Whitechocolate Book.gif|link=]] [[Extra Slot|ancient whitechocolate book]] |
| + | </td> | ||
| + | <td align="left" valign="top"> | ||
| + | <center>'''[[Jewelry]]'''</center> | ||
| + | [[File:Crystal Coin.gif|link=]] 3-6x crystal coin | ||
| + | |||
| + | [[File:Giant Amethyst.gif|link=]]giant amethyst<br> | ||
| + | [[File:Giant Ruby.gif|link=]] 1-2x giant ruby | ||
| − | = | + | [[File:Giant Emerald.gif|link=]]1-2x giant emerald |
| − | |||
| − | + | [[File:Giant Topaz.gif|link=]]1-2x giant topaz | |
| − | |||
| − | |||
| − | |||
| − | |||
| − | |||
| − | |||
| − | |||
| − | |||
| − | |||
| + | [[File:Giant Sapphire.gif|link=]]giant sapphire | ||
| + | </td> | ||
| + | <td align="left" valign="top"> | ||
| + | <center>'''[[Liquids]]'''</center> | ||
| + | [[File:Ultimate Mana Potion.gif|link=]] 1-16x ultimate mana potion<br> | ||
| + | [[File:Ultimate Spirit Potion.gif|link=]] 1-16x ultimate spirit potion<br> | ||
| + | [[File:Supreme Health Potion.gif|link=]] 1-16x supreme health potion<br> | ||
| + | [[File:Mastermind Potion.gif|link=]] 1-5x mastermind potion<br> | ||
| + | [[File:Bullseye Potion.gif|link=]] 1-5x bullseye potion<br> | ||
| + | [[File:Berserk Potion.gif|link=]] 2-5x berserk potion | ||
| + | </td> | ||
| + | </tr> | ||
<tr> | <tr> | ||
| − | <td align=" | + | <td align="left" valign="top"> |
| − | + | <center>[[Gem Atelier|'''Gems''']] | |
| − | < | + | [[File:Lesser Marksman Gem.gif|link=]][[File:Lesser Mystic Gem.gif|link=]][[File:Lesser Sage Gem.gif|link=]][[File:Lesser Guardian Gem.gif|link=]][[File:Lesser Spiritualist Gem.gif|link=]][[File:Lesser Ninja Gem.gif|link=]] |
| − | <td align=" | + | |
| − | + | [[File:Marksman Gem.gif|link=]][[File:Mystic Gem.gif|link=]][[File:Sage Gem.gif|link=]][[File:Guardian Gem.gif|link=]][[File:Spiritualist Gem.gif|alt=]][[File:Ninja Gem.gif|link=]] | |
| − | < | + | |
| − | + | [[File:Greater Marksman Gem.gif|link=]][[File:Greater Mystic Gem.gif|link=]][[File:Greater Sage Gem.gif|link=]][[File:Greater Guardian Gem.gif|link=]][[File:Greater Spiritualist Gem.gif|alt=]][[File:Greater Ninja Gem.gif|link=]] | |
| + | </center> | ||
| + | </td> | ||
| + | <td align="left" valign="top"> | ||
| + | <center>[[Pet Upgrading#Boosts|'''Pet Boost Tokens''']] | ||
| + | [[File:petice.gif|link=]][[File:petdeath.gif|link=]][[File:petholy.gif|link=]][[File:petfire.gif|link=]][[File:petenergy.gif|link=]][[File:petearth.gif|link=]] | ||
| + | [[File:petphysical.gif|link=]][[File:petdistance.gif|link=]][[File:petmagic.gif|link=]][[File:petdmg.gif|link=]][[File:petmelee.gif|link=]]</center> | ||
| + | </td> | ||
| + | <td align="left" valign="top"></td> | ||
| + | </tr> | ||
</table> | </table> | ||
| − | === | + | == Location == |
| − | + | 1. Take the waypoint to <b>[[Waypoint System#Orr|Orr - Ruins of Orr]]</b> | |
| + | |||
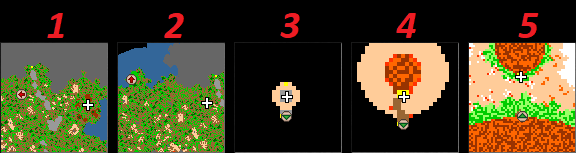
| + | 2. Follow the maps below to find Candia entrance and The Cake. | ||
| + | * On map 2, "enter" on the donut that leads to Candia. | ||
| + | |||
| + | [[file:sugar mommy map 1.png|link=]] | ||
| + | |||
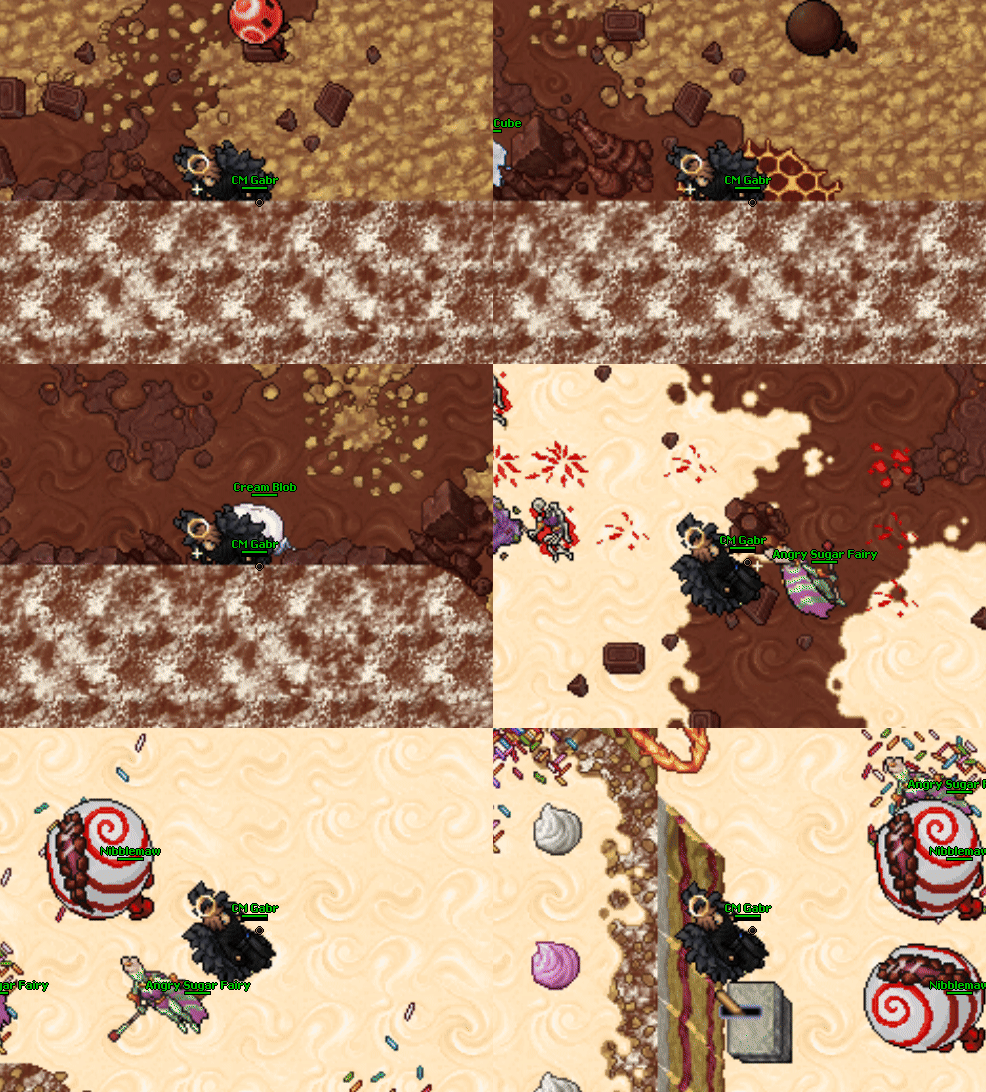
| + | 3. Once you reach this point, use your levitate spell <i>(exani hur "up)</i> to climb to the top. | ||
| + | |||
| + | [[file:sugar mommy levitate.gif|link=]] | ||
| + | |||
| + | 4. Pull the lever and select the desired challenge level.<br> | ||
| + | You can go either solo or with other 9 people. | ||
| + | |||
| + | == Mechanics == | ||
| + | This boss has two forms: its regular form and its Angry form. | ||
| + | |||
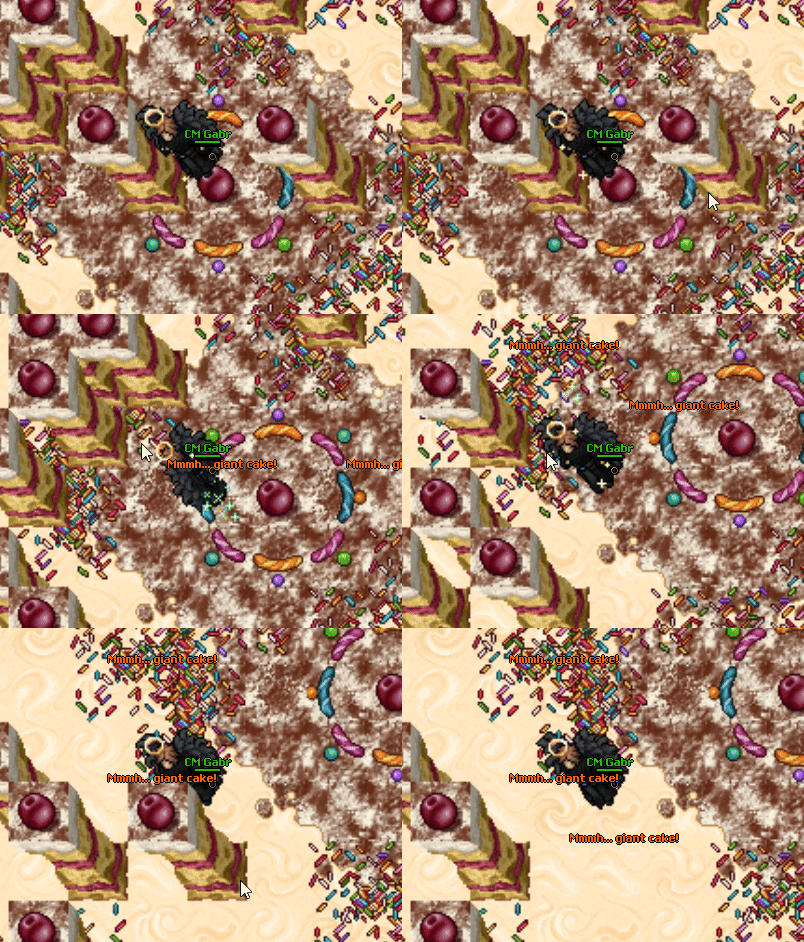
| + | During the fight, sometimes it will spawn a Cake Pillar all around the room. [[file:Cake (Pillar).gif|link=]] | ||
| + | |||
| + | Everyone but the blocker should click (eat) them.<br> | ||
| + | If all Cake Pillars gets eaten, the fight can proceed. | ||
| + | |||
| + | Otherwise, if any cake hasn't been eaten, the boss will enrage into its Angry form. | ||
| + | |||
| + | [[File:Sugar Mommy cakes.gif|link=]] | ||
| − | + | === Angry Sugar Mommy === | |
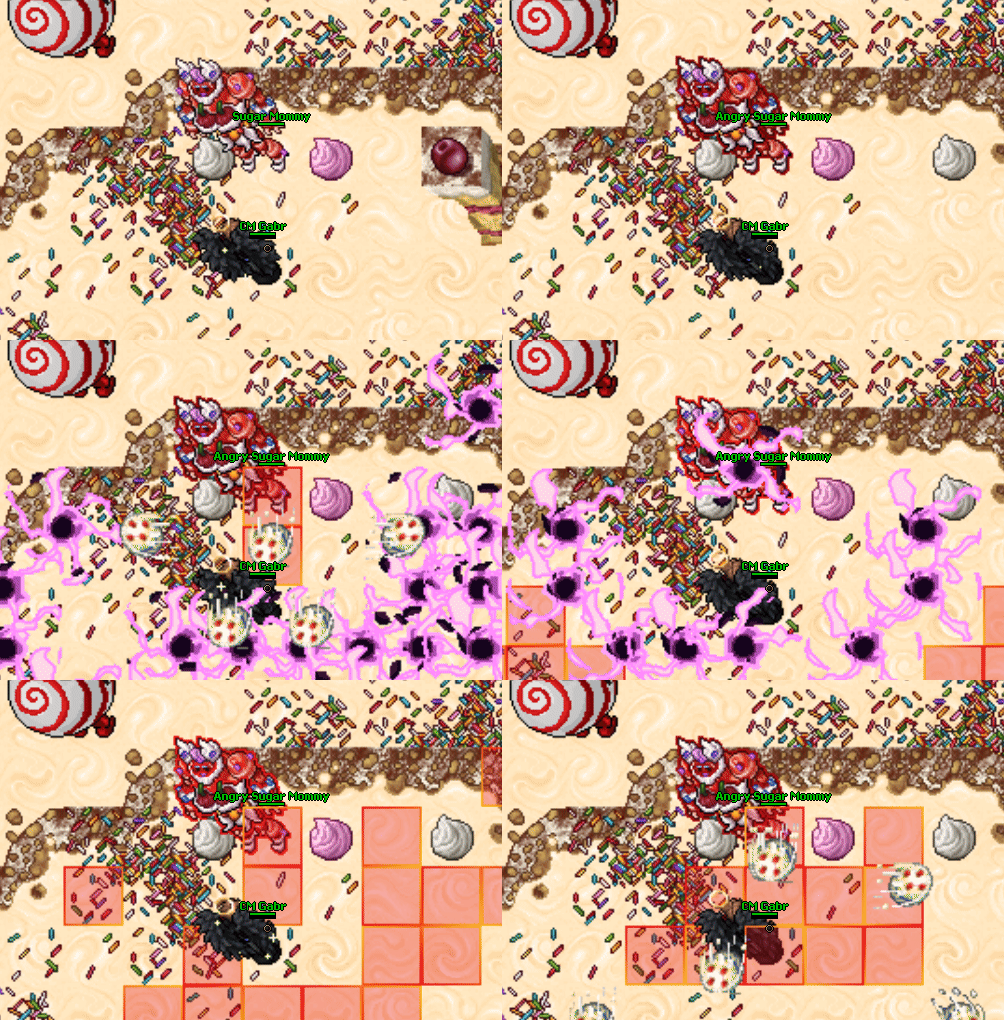
| − | + | While on that form, it will spawn some [[Boss Mechanics|red alerts]] around it.<br> | |
| − | + | At the same time, it will become stronger and resistant to all kind of damage. | |
| − | + | ||
| − | + | Make your way to survive until it goes back to its previous form where the Cake Pillars starts to spawn again. | |
| − | |||
| − | |||
| − | + | [[File:Angry Sugar Mommy.gif|link=]] | |
| − | |||
| − | |||
| − | |||
| − | |||
| − | + | Repeat it until the boss is dead. | |
Latest revision as of 01:27, 12 August 2026
Boss
To go back to the bosses page, click here.

Boss Info
 Classification: Archfoe
 Location: Candia
 Health: 3.5kk
 Experience: 12.5kk
Bosstiary Progress
 Prowess: 5 kills
 Expertise: 20 kills
 Mastery: 40 kills
Loot Table
|
|
|
|
|
|
     |


 3-6x crystal coin
 giant amethyst
 1-2x giant ruby
 1-2x giant emerald
 1-2x giant topaz
 giant sapphire
 1-16x ultimate mana potion
 1-16x ultimate spirit potion
 1-16x supreme health potion
 1-5x mastermind potion
 1-5x bullseye potion
 2-5x berserk potion


Location
1. Take the waypoint to Orr - Ruins of Orr
2. Follow the maps below to find Candia entrance and The Cake.
- On map 2, "enter" on the donut that leads to Candia.
3. Once you reach this point, use your levitate spell (exani hur "up) to climb to the top.
4. Pull the lever and select the desired challenge level.
You can go either solo or with other 9 people.
Mechanics
This boss has two forms: its regular form and its Angry form.
During the fight, sometimes it will spawn a Cake Pillar all around the room. 
Everyone but the blocker should click (eat) them.
If all Cake Pillars gets eaten, the fight can proceed.
Otherwise, if any cake hasn't been eaten, the boss will enrage into its Angry form.
Angry Sugar Mommy
While on that form, it will spawn some red alerts around it.
At the same time, it will become stronger and resistant to all kind of damage.
Make your way to survive until it goes back to its previous form where the Cake Pillars starts to spawn again.
Repeat it until the boss is dead.