Difference between revisions of "Emperor Aredhel"
| (11 intermediate revisions by the same user not shown) | |||
| Line 1: | Line 1: | ||
| − | == | + | == Boss == |
| − | <i>To go back to bosses page, [[Bosses|click here]]</i> | + | <i>To go back to bosses page, [[Bosses List|click here]]</i> |
<hr> | <hr> | ||
| − | + | [[File:Emperor Aredhel.gif|link=]] | |
| − | |||
| − | [[File: | + | <b>Boss Info</b><br> |
| + | [[file:Bosstiary Archfoe.png|link=]] Classification: Archfoe<br> | ||
| + | [[file:Speed Icon.gif|link=]] Location: Dream Courts<br> | ||
| + | [[File:HP Icon.gif|link=]] Health: 22kk<br> | ||
| + | [[File:XP Icon.gif|link=]] Experience: 420k<br> | ||
| − | + | <b>Bosstiary Progress</b><br> | |
| − | < | + | [[file:Prowess Icon.gif|link=]] Prowess: 5 kills<br> |
| − | + | [[file:Expertise Icon.gif|link=]] Expertise: 20 kills<br> | |
| − | + | [[file:Mastery Icon.gif|link=]] Mastery: 40 kills<br> | |
| − | |||
| − | |||
| − | |||
| − | |||
| − | |||
| − | + | == Loot Table == | |
| − | |||
| − | |||
| − | |||
| − | |||
| − | |||
| − | |||
| − | |||
| − | |||
| − | |||
| − | |||
| − | |||
| − | |||
| − | |||
| − | |||
| − | |||
| − | |||
| − | |||
| − | |||
| − | |||
| − | |||
| − | |||
| − | |||
| − | |||
| − | |||
| − | |||
| − | |||
| − | |||
| − | |||
| − | |||
| − | |||
| − | |||
| − | |||
| − | |||
<table class="wikitable sortable"> | <table class="wikitable sortable"> | ||
| − | |||
| − | |||
| − | |||
| − | |||
| − | |||
| − | |||
| − | |||
| − | |||
| − | |||
| − | |||
| − | |||
| − | |||
| − | |||
<tr> | <tr> | ||
| − | <td align="center | + | <td align="left" valign="top"> |
| − | + | <center>'''[[Items|Boss Items]]'''</center> | |
| − | + | [[File:Boss Coin2.gif|link=]] [[Boss Coin Shop|1-4x boss coin]]<br> | |
| − | + | [[File:Relic Chest.gif|link=]] [[Relics#Relic_List|relic chest]] | |
| − | + | [[File:Attunement Item 4.gif|alt=]] [[Soul Attunement|soul of true emperor aredhel]] | |
| − | |||
| − | |||
| − | |||
| − | |||
| − | |||
| − | |||
| − | |||
| − | |||
| − | |||
| − | |||
| − | + | [[File:Dreamfire Claw.gif|link=]][[Rings|dreamfire claw]]<br>[[File:Dreamfrost Claw.gif|link=]][[Rings|dreamfrost claw]] | |
| − | |||
| − | |||
| − | |||
| − | |||
| − | + | [[File:Elemental Torch.gif|link=]] [[Extra Slot|elemental torch]]<br>[[File:Fire & Ice Brooch.gif|link=]] [[Extra Slot|fire & ice brooch]] | |
| − | |||
| − | |||
| − | |||
| − | |||
| − | + | [[File:Dreamfire Staff.gif|link=]][[Wands|dreamfire wand]]<br>[[File:Dreamfrost Staff.gif|link=]][[Rods|dreamfrost rod]] | |
| − | |||
| − | |||
| − | |||
| − | |||
| − | + | [[File:Dreamfire Bow.gif|link=]][[Bows|dreamfire bow]]<br>[[File:Dreamfrost Bow.gif|link=]][[Bows|dreamfrost bow]] | |
| − | |||
| − | |||
| − | |||
| − | |||
| − | + | [[File:Dreamfire Crossbow.gif|link=]][[Crossbows|dreamfire crossbow]]<br>[[File:Dreamfrost Crossbow.gif|link=]][[Crossbows|dreamfrost crossbow]] | |
| − | |||
| − | |||
| − | |||
| − | |||
| − | + | [[File:Dreamfire Sword2.gif|link=]][[Swords|dreamfire sword]]<br>[[File:Dreamfrost Sword.gif|link=]][[Crossbows|dreamfrost sword]] | |
| − | |||
| − | |||
| − | |||
| − | |||
| − | + | [[File:Dreamfire Axe.gif|link=]][[Axes|dreamfire axe]]<br>[[File:Dreamfrost Axe.gif|link=]][[Axes|dreamfrost axe]] | |
| − | |||
| − | |||
| − | |||
| − | |||
| − | + | [[File:Dreamfire Mace.gif|link=]][[Clubs|dreamfire mace]]<br>[[File:Dreamfrost Mace.gif|link=]][[Clubs|dreamfrost mace]] | |
| − | |||
| − | |||
| − | |||
| − | |||
| − | < | + | [[File:Dreamfire Sword.gif|link=]][[Swords|dreamfire dagger]]<br>[[File:Dreamfrost Dagger.gif|link=]][[Daggers|dreamfrost dagger]] |
| − | + | </td> | |
| − | <td align=" | + | <td align="left" valign="top"> |
| − | + | <center>'''[[Jewelry]]'''</center> | |
| − | < | + | [[File:Crystal Coin.gif|link=]] 3-6x crystal coin |
| − | + | [[File:Giant Amethyst.gif|link=]]giant amethyst<br> | |
| − | + | [[File:Giant Ruby.gif|link=]] 1-2x giant ruby | |
| − | |||
| − | |||
| − | |||
| − | + | [[File:Giant Emerald.gif|link=]]1-2x giant emerald | |
| − | |||
| − | |||
| − | |||
| − | |||
| − | + | [[File:Giant Topaz.gif|link=]]1-2x giant topaz | |
| − | |||
| − | |||
| − | |||
| − | |||
| + | [[File:Giant Sapphire.gif|link=]]giant sapphire | ||
| + | </td> | ||
| + | <td align="left" valign="top"> | ||
| + | <center>'''[[Liquids]]'''</center> | ||
| + | [[File:Ultimate Mana Potion.gif|link=]] 1-16x ultimate mana potion<br> | ||
| + | [[File:Ultimate Spirit Potion.gif|link=]] 1-16x ultimate spirit potion<br> | ||
| + | [[File:Supreme Health Potion.gif|link=]] 1-16x supreme health potion<br> | ||
| + | [[File:Mastermind Potion.gif|link=]] 1-5x mastermind potion<br> | ||
| + | [[File:Bullseye Potion.gif|link=]] 1-5x bullseye potion<br> | ||
| + | [[File:Berserk Potion.gif|link=]] 2-5x berserk potion | ||
| + | </td> | ||
| + | </tr> | ||
<tr> | <tr> | ||
| − | <td align="center | + | <td align="left" valign="top"> |
| − | + | <center>[[Gem Atelier|'''Gems''']] | |
| − | + | [[File:Lesser Marksman Gem.gif|link=]][[File:Lesser Mystic Gem.gif|link=]][[File:Lesser Sage Gem.gif|link=]][[File:Lesser Guardian Gem.gif|link=]][[File:Lesser Spiritualist Gem.gif|link=]][[File:Lesser Ninja Gem.gif|link=]] | |
| − | |||
| − | + | [[File:Marksman Gem.gif|link=]][[File:Mystic Gem.gif|link=]][[File:Sage Gem.gif|link=]][[File:Guardian Gem.gif|link=]][[File:Spiritualist Gem.gif|alt=]][[File:Ninja Gem.gif|link=]] | |
| − | |||
| − | |||
| − | |||
| − | |||
| − | + | [[File:Greater Marksman Gem.gif|link=]][[File:Greater Mystic Gem.gif|link=]][[File:Greater Sage Gem.gif|link=]][[File:Greater Guardian Gem.gif|link=]][[File:Greater Spiritualist Gem.gif|alt=]][[File:Greater Ninja Gem.gif|link=]] | |
| − | + | </center> | |
| − | + | </td> | |
| − | + | <td align="left" valign="top"> | |
| − | <td align=" | + | <center>[[Pet Upgrading#Boosts|'''Pet Boost Tokens''']] |
| + | [[File:petice.gif|link=]][[File:petdeath.gif|link=]][[File:petholy.gif|link=]][[File:petfire.gif|link=]][[File:petenergy.gif|link=]][[File:petearth.gif|link=]] | ||
| − | + | [[File:petphysical.gif|link=]][[File:petdistance.gif|link=]][[File:petmagic.gif|link=]][[File:petdmg.gif|link=]][[File:petmelee.gif|link=]]</center> | |
| − | + | </td> | |
| − | + | <td align="left" valign="top"></td> | |
| − | + | </tr> | |
| − | + | </table> | |
| − | |||
| − | |||
| − | |||
| − | |||
| − | |||
| − | |||
| − | |||
| − | |||
| − | |||
| − | |||
| − | |||
| − | |||
| − | |||
| − | |||
| − | |||
| − | |||
| − | |||
| − | |||
| − | |||
| − | |||
| − | |||
| − | |||
| − | |||
| − | |||
| − | |||
| − | |||
| − | |||
| − | |||
| − | |||
| − | |||
| − | |||
| − | |||
| − | |||
| − | |||
| − | |||
| − | |||
| − | |||
| − | |||
| − | <td align=" | ||
| − | |||
| − | |||
| − | |||
| − | + | == Location == | |
| − | + | 1. Take the waypoint to <b><i>[[Waypoint System#Shattered Sands|Shattered Sands - Winter Court]]</b></i> | |
| − | < | ||
| − | |||
| − | |||
| − | + | 2. Follow the maps below. | |
| − | + | * On map number 3, click on the summer symbol on the floor to get teleported to the lever room. | |
| − | + | [[file:emperor aredhel map.png|link=]] | |
| − | |||
| − | |||
| − | + | 3. To face Emperor Aredhel, pull the lever.<br> | |
| − | + | You can go either solo or with other 16 players. | |
| − | |||
| − | |||
| − | |||
| − | + | [[file:emperor aredhel lever.gif|link=]] | |
| − | |||
| − | |||
| − | |||
| − | |||
| − | + | == Mechanics == | |
| − | + | === Emperor Aredhel === | |
| − | + | The regular form of the boss. Just deal damage to him without any trouble.<br> | |
| − | < | + | The main mechanic here is at his Angry Emperor Aredhel form. |
| − | |||
| − | + | [[file:emperor aredhel fight.gif|link=]] | |
| − | |||
| − | |||
| − | |||
| − | |||
| − | < | + | === Angry Emperor Aredhel === |
| − | + | Once he turns to his Angry form, he will become immune summoning two vortexes:<br> | |
| − | + | [[file:Summer Ward Stone.gif|link=]] Summer Vortex on the left side of the room.<br> | |
| − | + | Summer Vortex will summon a minion called Summer Spirit. | |
| − | |||
| − | + | [[file:Winter Ward Stone.gif|link=]] Winter Vortex on the right side of the room.<br> | |
| − | + | Winter Vortex will summon a minion called Winter Spirit. | |
| − | |||
| − | |||
| − | |||
| − | < | + | Your main goal in here is to lure the Ice/Fire to the opposite field and kill it closer to the opposite Vortex.<br> |
| − | + | If you did it close enough, the vortex will get damaged. You need to repeat it five times to slain the Vortex. | |
| − | |||
| − | |||
| − | |||
| − | < | + | <b>Pro tip: </b>damage both vortexes 4 times only and do the 5th as fast as possible on both because it can respawn again with full health. |
| − | |||
| − | |||
| − | |||
| − | |||
| − | + | When both Vortexes are destroyed, the boss turns back into his Emperor Aredhel form and can be damaged again. | |
| − | |||
| − | |||
| − | |||
| − | |||
| − | + | [[file:angry emperor aredhel fight.gif|link=]] | |
| − | |||
| − | |||
| − | |||
| − | |||
| − | + | === True Emperor Aredhel === | |
| − | + | Once he is on the red HP, he will transform into his final form, which is stronger than the previous one, plus deals bosses regular mechanics. | |
| − | |||
| − | |||
| − | |||
| − | + | It can still turn into Angry Emperor Aredhel form again, but you don't need to do the Vortexes mechanics, just wait for him to turn back into True Emperor Aredhel and slay him. | |
| − | |||
| − | |||
| − | |||
| − | |||
| − | + | [[file:true emperor aredhel fight.gif|link=]] | |
Latest revision as of 00:48, 12 August 2026
Boss
To go back to bosses page, click here

Boss Info
 Classification: Archfoe
 Location: Dream Courts
 Health: 22kk
 Experience: 420k
Bosstiary Progress
 Prowess: 5 kills
 Expertise: 20 kills
 Mastery: 40 kills
Loot Table
|
|
|
|
|
|
     |


 3-6x crystal coin
 giant amethyst
 1-2x giant ruby
 1-2x giant emerald
 1-2x giant topaz
 giant sapphire
 1-16x ultimate mana potion
 1-16x ultimate spirit potion
 1-16x supreme health potion
 1-5x mastermind potion
 1-5x bullseye potion
 2-5x berserk potion


Location
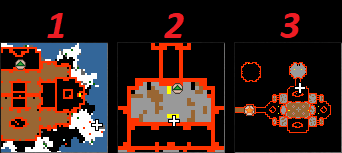
1. Take the waypoint to Shattered Sands - Winter Court
2. Follow the maps below.
- On map number 3, click on the summer symbol on the floor to get teleported to the lever room.
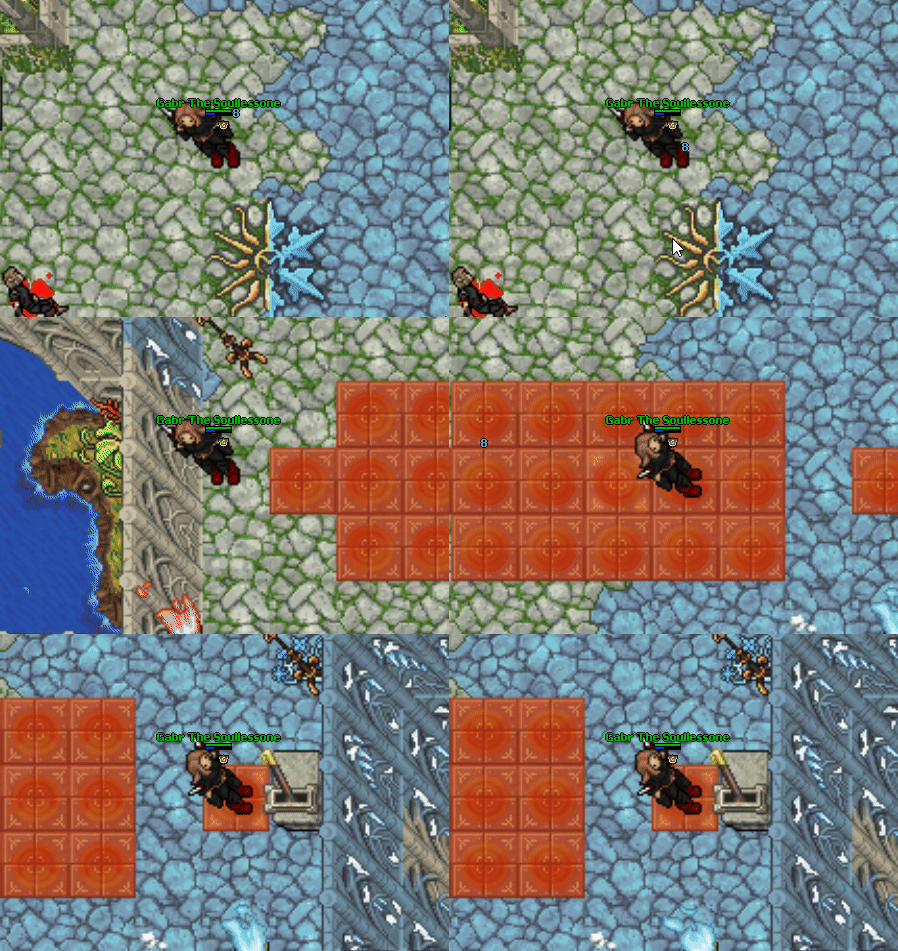
3. To face Emperor Aredhel, pull the lever.
You can go either solo or with other 16 players.
Mechanics
Emperor Aredhel
The regular form of the boss. Just deal damage to him without any trouble.
The main mechanic here is at his Angry Emperor Aredhel form.
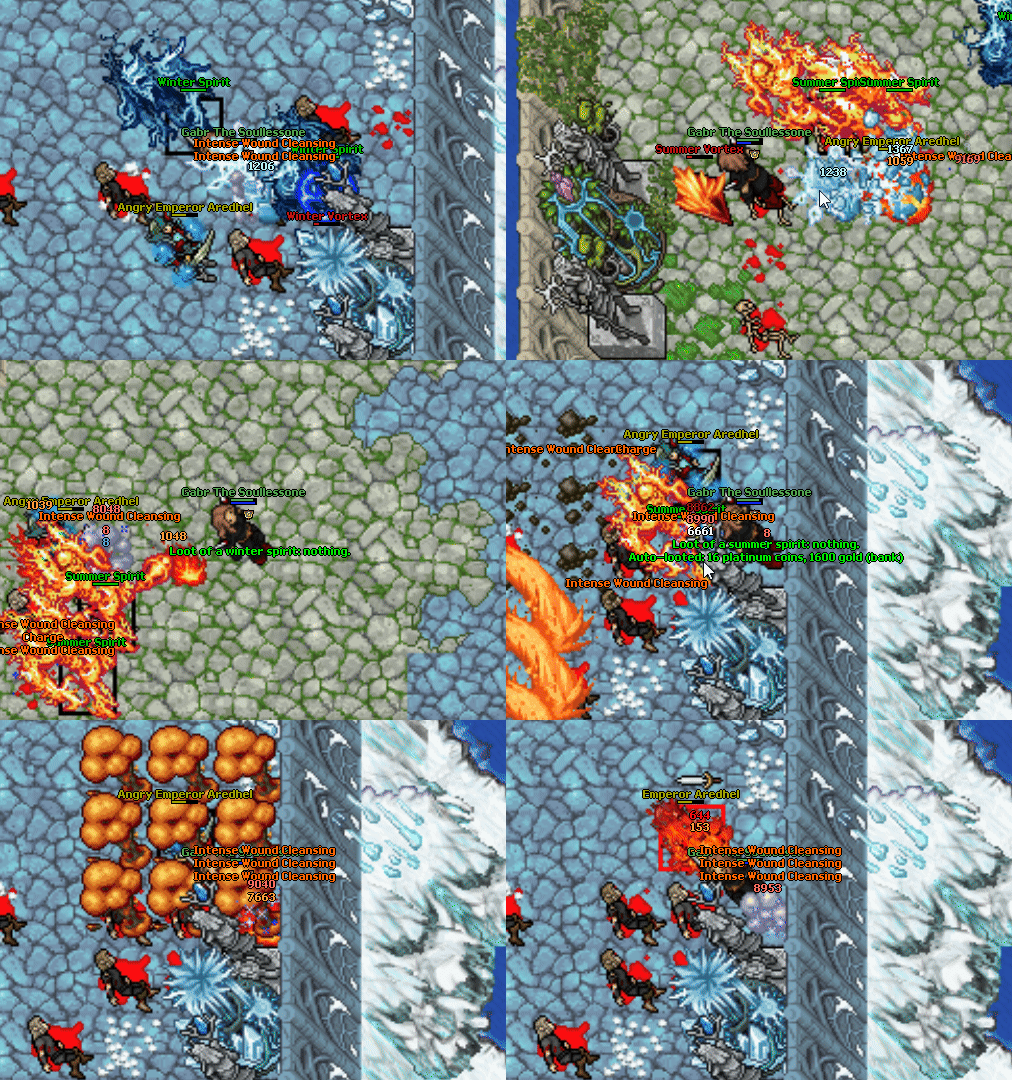
Angry Emperor Aredhel
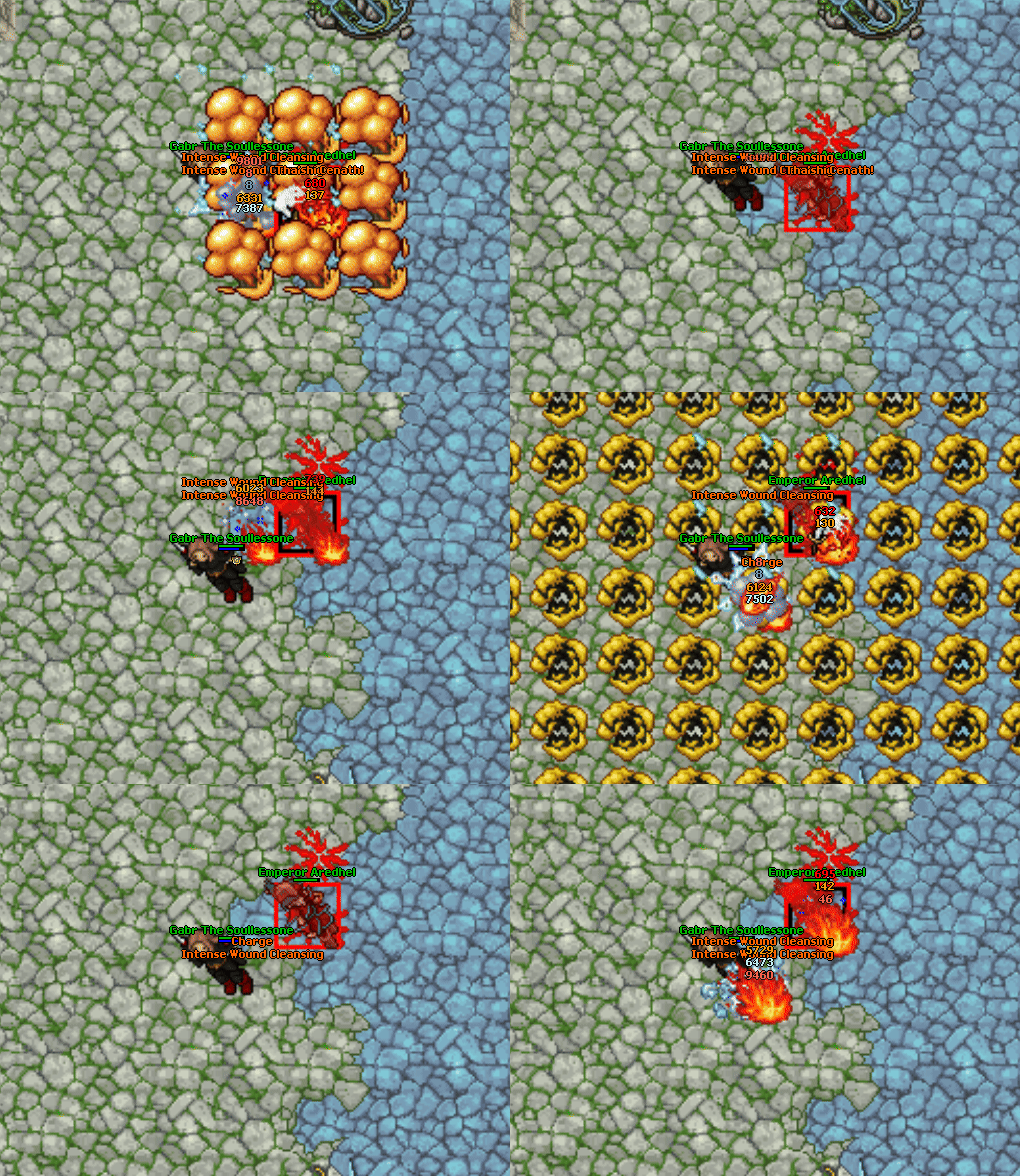
Once he turns to his Angry form, he will become immune summoning two vortexes:
 Summer Vortex on the left side of the room.
Summer Vortex will summon a minion called Summer Spirit.
 Winter Vortex on the right side of the room.
Winter Vortex will summon a minion called Winter Spirit.
Your main goal in here is to lure the Ice/Fire to the opposite field and kill it closer to the opposite Vortex.
If you did it close enough, the vortex will get damaged. You need to repeat it five times to slain the Vortex.
Pro tip: damage both vortexes 4 times only and do the 5th as fast as possible on both because it can respawn again with full health.
When both Vortexes are destroyed, the boss turns back into his Emperor Aredhel form and can be damaged again.
True Emperor Aredhel
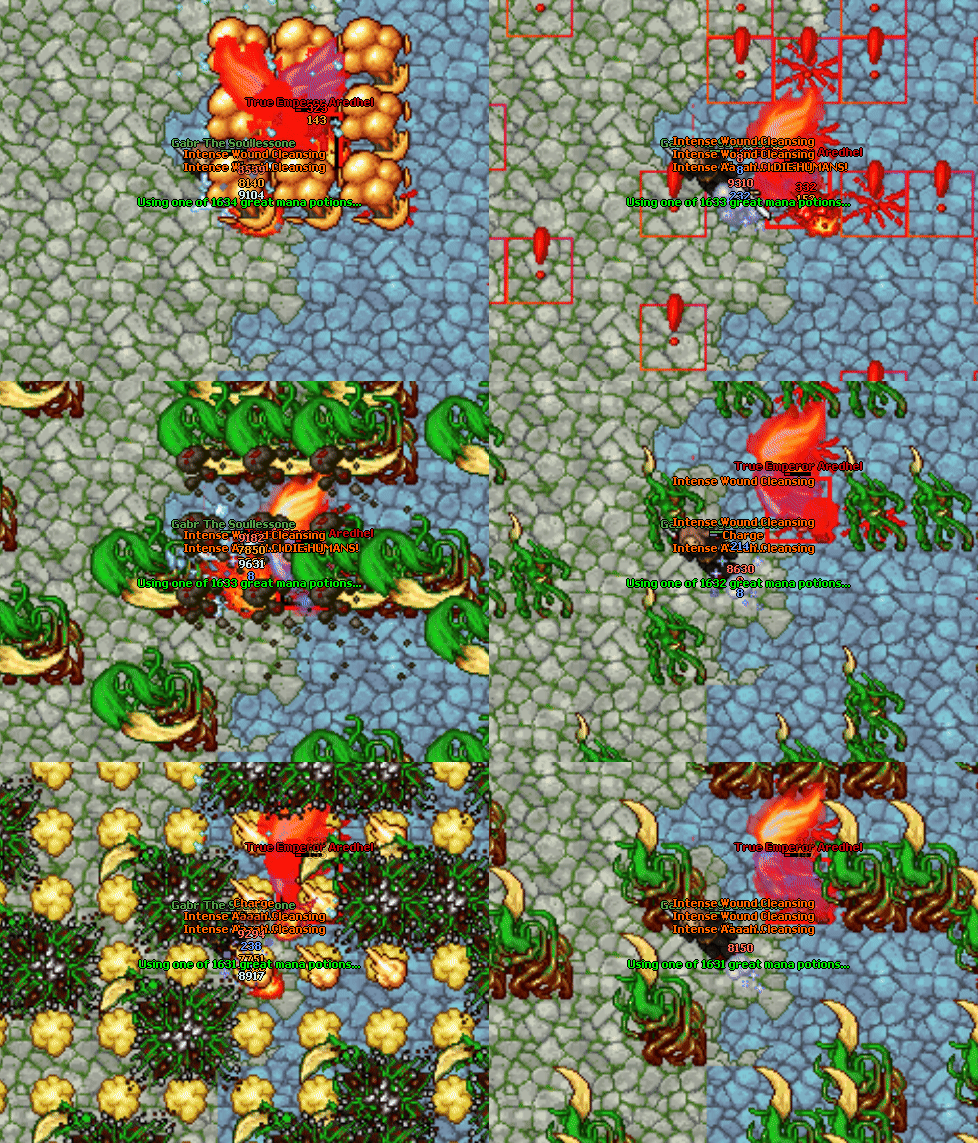
Once he is on the red HP, he will transform into his final form, which is stronger than the previous one, plus deals bosses regular mechanics.
It can still turn into Angry Emperor Aredhel form again, but you don't need to do the Vortexes mechanics, just wait for him to turn back into True Emperor Aredhel and slay him.