Difference between revisions of "Urbatulhu The Combustor"
(Created page with "== Urbatulhu The Combustor == <i>To go back to bosses page, click here</i> <hr> Location: urbatulhu's reign<br> Requires <b>...") |
|||
| (13 intermediate revisions by the same user not shown) | |||
| Line 1: | Line 1: | ||
| − | == | + | == Boss == |
| − | <i>To go back to bosses page, [[Bosses|click here]]</i> | + | <i>To go back to bosses page, [[Bosses List|click here]]</i> |
<hr> | <hr> | ||
| − | + | [[File:Urbatulhu The Combustor.gif|link=]] | |
| − | |||
| − | [[File: | + | <b>Boss Info</b><br> |
| + | [[file:Bosstiary Archfoe.png|link=]] Classification: Archfoe<br> | ||
| + | [[file:Speed Icon.gif|link=]] Location: Urbatulhu's Reign<br> | ||
| + | [[File:HP Icon.gif|link=]] Health: 2.5kk<br> | ||
| + | [[File:XP Icon.gif|link=]] Experience: 15k<br> | ||
| − | + | <b>Bosstiary Progress</b><br> | |
| − | < | + | [[file:Prowess Icon.gif|link=]] Prowess: 5 kills<br> |
| − | + | [[file:Expertise Icon.gif|link=]] Expertise: 20 kills<br> | |
| − | + | [[file:Mastery Icon.gif|link=]] Mastery: 40 kills<br> | |
| − | |||
| − | |||
| − | |||
| − | |||
| − | |||
| + | == Loot Table == | ||
| + | |||
| + | <table class="wikitable sortable"> | ||
<tr> | <tr> | ||
| − | <td align=" | + | <td align="left" valign="top"> |
| − | + | <center>'''[[Items|Boss Items]]'''</center> | |
| − | < | + | [[File:Boss Coin2.gif|link=]] [[Boss Coin Shop|1-2x boss coin]]<br> |
| − | + | [[File:Relic Chest.gif|link=]] [[Relics#Relic_List|relic chest]] | |
| − | |||
| − | + | [[File:Attunement Item 2.gif|alt=]] [[Soul Attunement|soul of true king urbatulhu]] | |
| − | = | + | [[File:Royal Sand Helmet.gif|link=]][[Helmets|royal sand helmet]] |
| − | |||
| − | + | [[File:Royal Sandplate.gif|link=]] [[Armors|royal sandplate]] | |
| − | |||
| − | |||
| − | |||
| − | |||
| − | |||
| − | |||
| − | |||
| − | |||
| − | |||
| − | + | [[File:Merudri Nanbando.gif|alt=]] [[Armors|merudri nanbando]]<br>[[File:Royal Sand Greaves.gif|link=]][[Legs|royal sand greaves]] | |
| − | |||
| − | |||
| − | |||
| − | |||
| − | |||
| − | |||
| − | |||
| − | + | [[File:Royal Sand Boots.gif|link=]][[Boots|royal sand boots]] | |
| − | = | + | [[File:Royal Sand Shield.gif|link=]][[Shields|royal sand shield]] |
| − | |||
| − | + | [[File:Tome Of The Sand King.gif|link=]][[Spellbooks|tome of the sand king]] | |
| − | |||
| − | |||
| − | |||
| − | |||
| − | |||
| − | |||
| − | + | [[File:Royal Sand Quiver.gif|link=]][[Quivers|royal sand quiver]] | |
| − | |||
| − | |||
| − | |||
| − | |||
| − | + | [[File:Amulet Of The Royal Sands.gif|link=]] [[Amulets|amulet of the royal sands]] | |
| − | |||
| − | |||
| − | |||
| − | |||
| − | + | [[File:Ring Of The Sand King.gif|link=]][[Rings|ring of the sand king]] | |
| − | |||
| − | |||
| − | |||
| − | |||
| − | + | [[File:Royal Sandpack.gif|link=]][[Backpacks|royal sandpack]] | |
| − | |||
| − | |||
| − | |||
| − | |||
| − | + | [[File:Wand Of Royal Sands.gif|link=]] [[Wands|wand of royal sands]]<br>[[File:Rod Of Royal Sands.gif|link=]] [[Rods|rod of royal sands]] | |
| − | |||
| − | |||
| − | |||
| − | |||
| − | + | [[File:Royal Sand Crossbow.gif|link=]][[Crossbows|royal sand crossbow]] | |
| − | |||
| − | |||
| − | |||
| − | |||
| − | + | [[File:Royal Sand Sword.gif|link=]] [[Swords|royal sand sword]] | |
| − | |||
| − | |||
| − | |||
| − | |||
| − | + | [[File:Royal Sand Cleaver.gif|link=]] [[Axes|royal sand cleaver]] | |
| − | |||
| − | |||
| − | |||
| − | |||
| − | + | [[File:Royal Sand Maul.gif|link=]] [[Clubs|royal sand maul]]<br>[[File:Royal Sandfang.gif|link=]] [[Daggers|royal sandfang]] | |
| − | |||
| − | |||
| − | |||
| − | |||
| − | < | + | </td> |
| − | <td align=" | + | <td align="left" valign="top"> |
| − | < | + | <center>'''[[Jewelry]]'''</center> |
| − | + | [[File:Crystal Coin.gif|link=]] 3-6x crystal coin | |
| − | |||
| − | + | [[File:Giant Amethyst.gif|link=]]giant amethyst<br> | |
| − | + | [[File:Giant Ruby.gif|link=]] 1-2x giant ruby | |
| − | |||
| − | |||
| − | |||
| − | + | [[File:Giant Emerald.gif|link=]]1-2x giant emerald | |
| − | |||
| − | |||
| − | |||
| − | |||
| − | + | [[File:Giant Topaz.gif|link=]]1-2x giant topaz | |
| − | |||
| − | |||
| − | |||
| − | |||
| + | [[File:Giant Sapphire.gif|link=]]giant sapphire | ||
| + | </td> | ||
| + | <td align="left" valign="top"> | ||
| + | <center>'''[[Liquids]]'''</center> | ||
| + | [[File:Ultimate Mana Potion.gif|link=]] 1-16x ultimate mana potion<br> | ||
| + | [[File:Ultimate Spirit Potion.gif|link=]] 1-16x ultimate spirit potion<br> | ||
| + | [[File:Supreme Health Potion.gif|link=]] 1-16x supreme health potion<br> | ||
| + | [[File:Mastermind Potion.gif|link=]] 1-5x mastermind potion<br> | ||
| + | [[File:Bullseye Potion.gif|link=]] 1-5x bullseye potion<br> | ||
| + | [[File:Berserk Potion.gif|link=]] 2-5x berserk potion | ||
| + | </td> | ||
| + | </tr> | ||
<tr> | <tr> | ||
| − | <td align="center | + | <td align="left" valign="top"> |
| − | + | <center>[[Gem Atelier|'''Gems''']] | |
| − | + | [[File:Lesser Marksman Gem.gif|link=]][[File:Lesser Mystic Gem.gif|link=]][[File:Lesser Sage Gem.gif|link=]][[File:Lesser Guardian Gem.gif|link=]][[File:Lesser Spiritualist Gem.gif|link=]][[File:Lesser Ninja Gem.gif|link=]] | |
| − | |||
| − | + | [[File:Marksman Gem.gif|link=]][[File:Mystic Gem.gif|link=]][[File:Sage Gem.gif|link=]][[File:Guardian Gem.gif|link=]][[File:Spiritualist Gem.gif|alt=]][[File:Ninja Gem.gif|link=]] | |
| − | |||
| − | |||
| − | |||
| − | |||
| − | + | [[File:Greater Marksman Gem.gif|link=]][[File:Greater Mystic Gem.gif|link=]][[File:Greater Sage Gem.gif|link=]][[File:Greater Guardian Gem.gif|link=]][[File:Greater Spiritualist Gem.gif|alt=]][[File:Greater Ninja Gem.gif|link=]] | |
| − | + | </center> | |
| − | + | </td> | |
| − | + | <td align="left" valign="top"> | |
| − | <td align=" | + | <center>[[Pet Upgrading#Boosts|'''Pet Boost Tokens''']] |
| + | [[File:petice.gif|link=]][[File:petdeath.gif|link=]][[File:petholy.gif|link=]][[File:petfire.gif|link=]][[File:petenergy.gif|link=]][[File:petearth.gif|link=]] | ||
| − | + | [[File:petphysical.gif|link=]][[File:petdistance.gif|link=]][[File:petmagic.gif|link=]][[File:petdmg.gif|link=]][[File:petmelee.gif|link=]]</center> | |
| − | + | </td> | |
| − | + | <td align="left" valign="top"></td> | |
| − | <td align=" | + | </tr> |
| − | < | + | </table> |
| − | + | == Location == | |
| − | < | + | <b>This boss requires three people to damage the boss.<br> |
| − | + | Entering the fight solo or in duo is not a guarantee that you will finish it.</b> | |
| − | |||
| − | |||
| − | < | + | 1. Take the waypoint to <b><i>[[Waypoint System#Shattered Sands|Shattered Sands - Shattered Sands Depot]]</b></i> |
| − | < | ||
| − | |||
| − | |||
| − | |||
| − | + | 2. Follow the maps below. | |
| − | + | * On the map 9, you must pull a lever on the marker position to enable the teleporter to the boss. | |
| − | |||
| − | |||
| − | |||
| − | + | [[file:urbatulhu map.png|link=]] | |
| − | |||
| − | |||
| − | |||
| − | |||
| − | + | 3. To face Urbatulhu The Combustor, pull the lever.<br> | |
| − | + | <b>It is highly recommended</b> going with at least 2 other people, but you can go with a total of 12. | |
| − | < | ||
| − | |||
| − | |||
| − | + | [[file:urbatulhu lever.gif|link=]] | |
| − | |||
| − | |||
| − | |||
| − | |||
| − | + | == Mechanics == | |
| − | + | The boss will be immune to all kind of damage until 25% HP. | |
| − | + | * Every corner of the room has 1 fire bowl (4 in total). | |
| − | + | * Three vortexes will spawn inside the room on random locations, being 2 green and 1 red. | |
| − | + | * Periodically, two Urbatulhu Minions will be spawned to inside the room. | |
| − | + | === The Boss Fight === | |
| − | + | * Lure the boss to the Red Vortex [[file:Urbatulhu The Combustor.gif|link=]] [[file:Red Vortex.gif|link=]] | |
| − | + | * Lure the minions to the Green Vortex [[file:Urbatulhu Minion2.gif|link=]] [[file:Green Vortex.gif|link=]] | |
| − | |||
| − | |||
| − | + | When everyone stands on their vortexes all four fire bowls will light up [[file:Fire Bowl.gif|link=]] | |
| − | |||
| − | |||
| − | |||
| − | |||
| − | + | [[file:urbatulhu the combustor fight.gif|link=]] | |
| − | |||
| − | |||
| − | |||
| − | |||
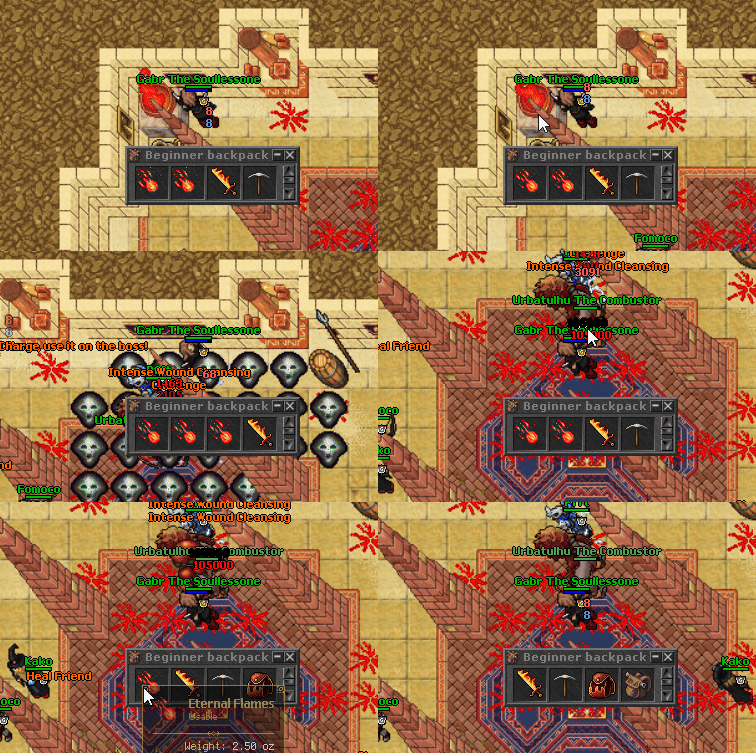
| − | + | Click on it to get an eternal flame and use it to damage the boss until 25% HP [[file:Eternal Flames.gif|link=]] | |
| − | |||
| − | |||
| − | |||
| − | |||
| − | + | Once he is below 25% HP, you can slay him to receive your loot. | |
| − | |||
| − | |||
| − | |||
| − | |||
| − | + | [[file:urbatulhu the combustor fight2.gif|link=]] | |
Latest revision as of 23:43, 11 August 2026
Boss
To go back to bosses page, click here

Boss Info
 Classification: Archfoe
 Location: Urbatulhu's Reign
 Health: 2.5kk
 Experience: 15k
Bosstiary Progress
 Prowess: 5 kills
 Expertise: 20 kills
 Mastery: 40 kills
Loot Table
|
|
|
|
|
|
     |


 3-6x crystal coin
 giant amethyst
 1-2x giant ruby
 1-2x giant emerald
 1-2x giant topaz
 giant sapphire
 1-16x ultimate mana potion
 1-16x ultimate spirit potion
 1-16x supreme health potion
 1-5x mastermind potion
 1-5x bullseye potion
 2-5x berserk potion


Location
This boss requires three people to damage the boss.
Entering the fight solo or in duo is not a guarantee that you will finish it.
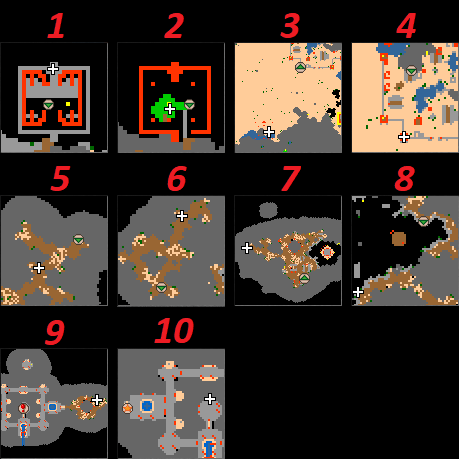
1. Take the waypoint to Shattered Sands - Shattered Sands Depot
2. Follow the maps below.
- On the map 9, you must pull a lever on the marker position to enable the teleporter to the boss.
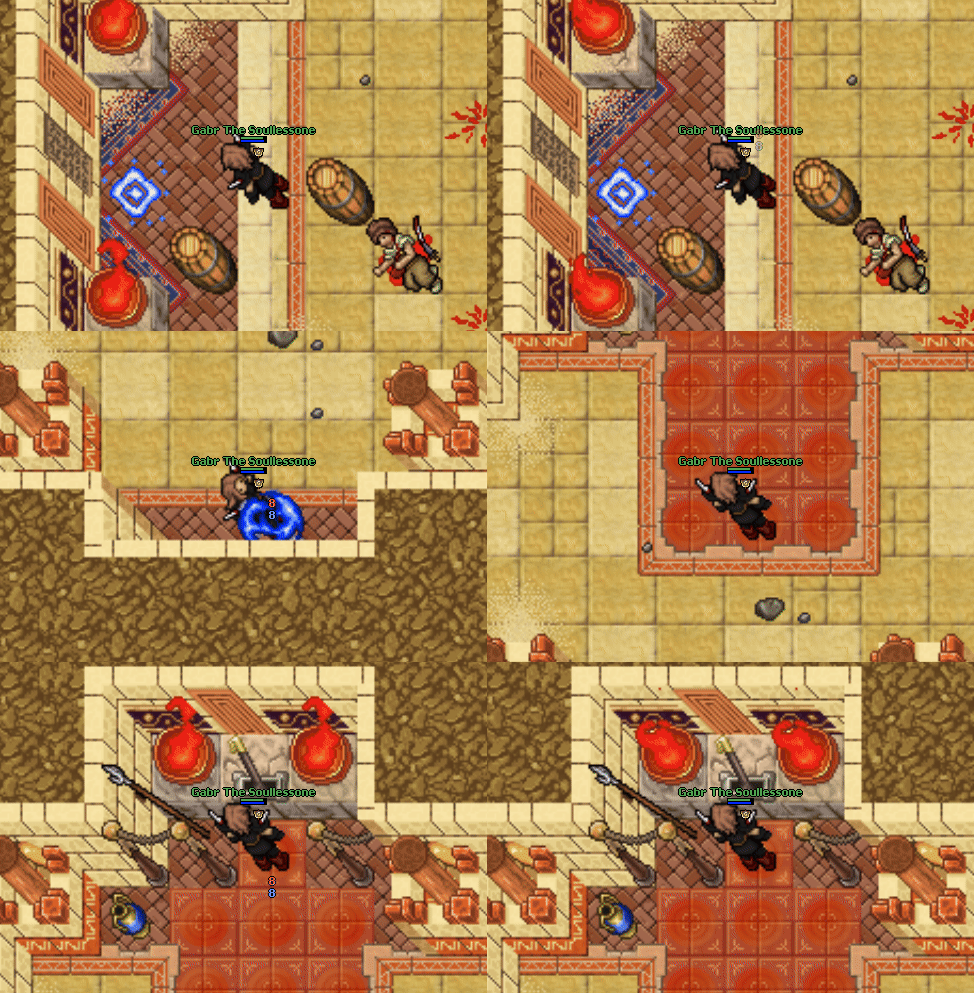
3. To face Urbatulhu The Combustor, pull the lever.
It is highly recommended going with at least 2 other people, but you can go with a total of 12.
Mechanics
The boss will be immune to all kind of damage until 25% HP.
- Every corner of the room has 1 fire bowl (4 in total).
- Three vortexes will spawn inside the room on random locations, being 2 green and 1 red.
- Periodically, two Urbatulhu Minions will be spawned to inside the room.
The Boss Fight
- Lure the boss to the Red Vortex

- Lure the minions to the Green Vortex


When everyone stands on their vortexes all four fire bowls will light up 
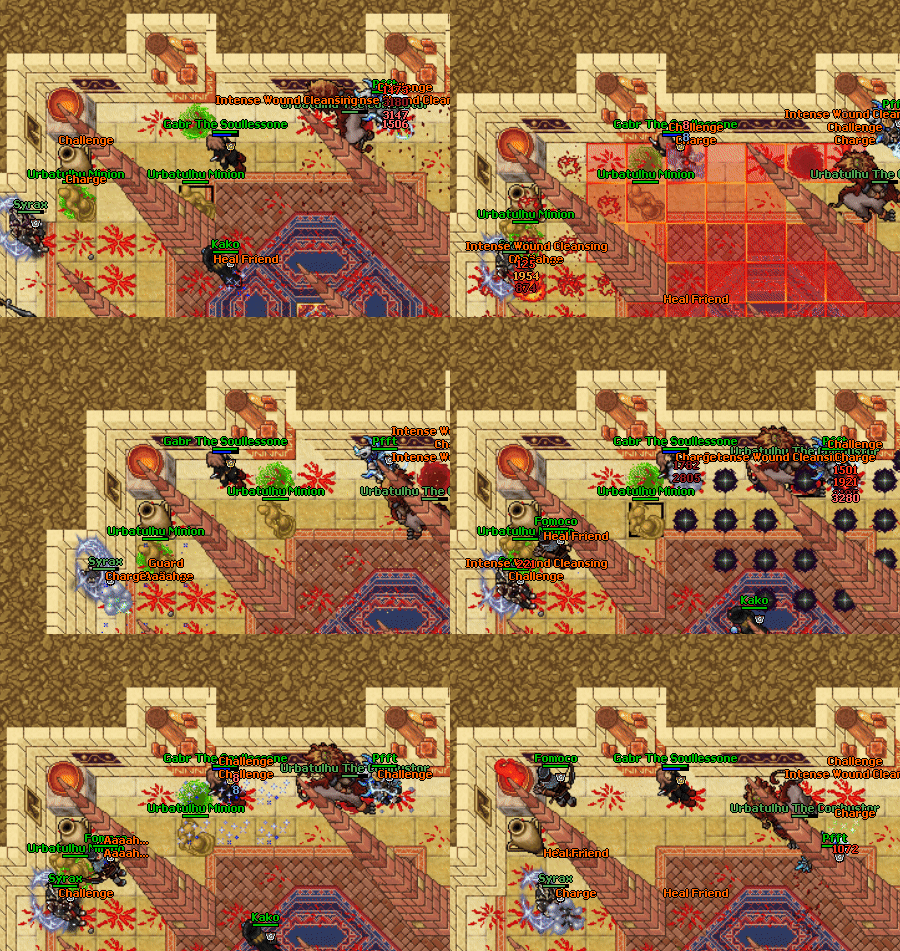
Click on it to get an eternal flame and use it to damage the boss until 25% HP 
Once he is below 25% HP, you can slay him to receive your loot.